Building an outdoor basketball court is one of the best ways to enhance your property while creating a dedicated space for fitness, recreation, and family fun. Whether for a home, school, or community area, a well-designed court offers long-term value and performance. This blog covers everything you need to know, from planning and sizing to construction and surface selection. With the right approach, materials, and professional expertise, you can build a durable, high-quality court that delivers consistent play and stands up to weather conditions for years to come.
Key Takeaways
- A durable outdoor basketball court starts with a properly engineered hard base (asphalt or concrete) and professional acrylic sport coatings, not synthetic turf or infilled modular systems.
- Most residential and community courts are half-court layouts (around 47’ x 50’) or scaled-down versions to fit typical yard sizes while maintaining safe run-off space.
- Planning decisions about location, drainage, permits, and lighting should be finalized before any excavation or concrete work begins.
- The typical build sequence follows: site selection and permits → excavation and grading → stone base → asphalt or concrete slab → acrylic or cushioned acrylic surfacing → goals, fencing, and lighting.
- Expect several weeks of construction time and five-figure budgets, depending on court size and site conditions, for a professionally installed court.
Planning Your Outdoor Basketball Court
Careful planning is the most important phase of any court project. The decisions you make here determine overall cost, playing area performance, and how easily the court can be maintained or resurfaced later. Before starting construction, take time to understand your property’s constraints and opportunities.
Start by sketching a scaled plan using graph paper or free software like SketchUp. Include your house, property lines, trees, slopes, and potential court footprint. Check HOA rules, local regulations, and any covenants about lights, perimeter fencing, and paved areas before committing to a design.
Choosing Court Size and Layout
Understanding standard dimensions helps you determine how much space you actually need. Here are common outdoor court sizes:
| Court Type | Dimensions | Best For |
| Full NBA/College | 94’ x 50’ | Large properties, schools, parks |
| High School | 84’ x 50’ | Community facilities |
| Half Court | 47’ x 50’ | Most residential installations |
| Backyard Compromise | 30’ x 50’ | Suburban lots with limited space |
| Shooting Court | 30’ x 25’ | Compact backyards |
Most residential properties cannot accommodate full-size courts. A 30’ x 50’ backyard court maintains regulation width while fitting smaller properties and providing space beyond the free-throw line for safe run-off. The free-throw lane distance (15’ from the backboard) should be preserved on any-sized court for competitive play.
Minimum clear safety run-offs should be at least 3 feet around the perimeter, with 8-10 feet ideal on end lines. Orient the court with the long axis roughly north-south to reduce players shooting hoops directly into early-morning or late-afternoon sun.
Selecting the Right Outdoor Playing Surface Type
The court surface system has two parts: the structural base (asphalt or concrete) and the sport surface (acrylic coating or cushioned acrylic layers). Understanding this distinction is essential for making informed decisions.
- Asphalt bases offer slight flexibility, often lower upfront costs, and feel comfortable underfoot. Unlike concrete, asphalt may show more movement in freeze-thaw climates without solid subbase preparation. Asphalt courts require professional installation for acceptable basketball performance.
- Concrete courts provide higher strength, excellent long-term performance, and precise leveling. A concrete slab must be properly jointed and reinforced to manage cracking. Concrete courts typically cost more initially but offer exceptional court durability.
- Acrylic coating is the primary recommended finish for outdoor basketball court flooring. These coatings are UV-stable, weather-resistant paint systems that provide controlled traction, custom colors, and straightforward resurfacing over time.
- Cushioned acrylic systems add multiple rubberized layers beneath the color coats for shock absorption and reduced joint impact. This surface material is popular for high-use courts at clubs, schools, or households with older athletes.
We do not install synthetic turf or infilled synthetic basketball surfaces. Those products play and wear differently than hard courts and are outside our scope of services.
Permits, Zoning, and Property Boundaries
Local regulations vary widely depending on your municipality. Contact your building department early to confirm whether permits are required for a new paved sports court, concrete slab, lights, or fencing.
Common 2026 requirements include:
- Impervious surface limits and stormwater management rules
- Setback distances from property lines (often 5-15 feet)
- Light pole height restrictions (typically 15-20 feet maximum)
- Noise ordinance compliance for residential areas
Obtain a recent survey or locate property boundary pins before pouring concrete. Permit approvals often take 2-8 weeks, so build this into your project timeline. Calling 811 to mark underground utilities is mandatory before any excavation.
Site Selection, Drainage, and Base Preparation
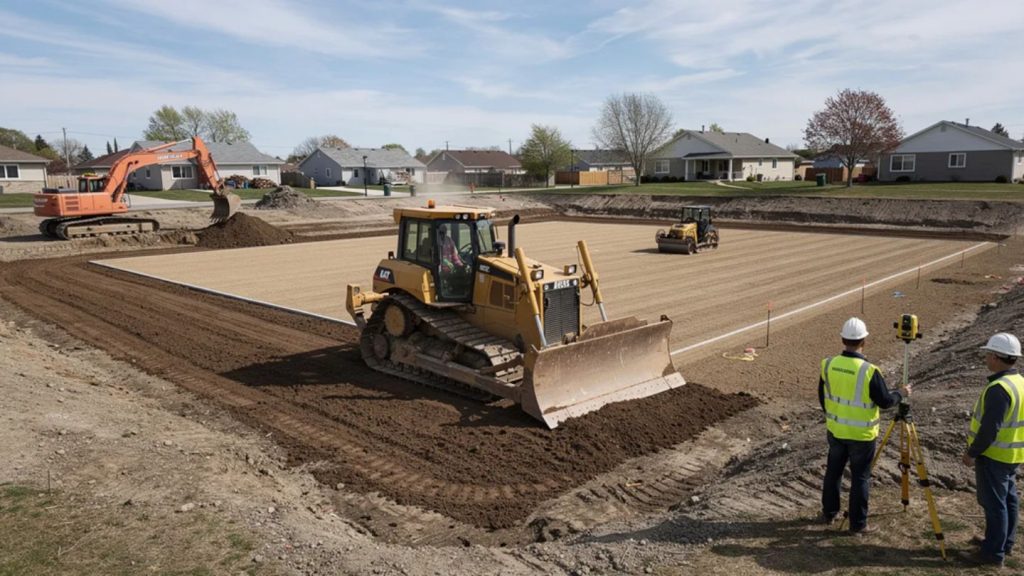
A stable foundation and well-drained base are the biggest predictors of how long your outdoor basketball court will stay crack-free and level. Proper site preparation prevents water pooling and ensures the court’s lifespan meets expectations.
Evaluating and Choosing the Court Location
Select the naturally flattest area on your property to minimize excavation and keep costs down. Choosing a flat surface reduces the amount of material needed for grading and fill work.
- Important factors to consider:
- Stay at least 5-10 feet from large mature tree trunks to minimize root damage and future heaving
- Consider noise impact on neighbors and position the court away from bedroom windows when possible
- Evaluate equipment access for concrete trucks and asphalt pavers; narrow gates or steep grades significantly increase costs
- Avoid low spots where standing water collects after rain
For example, a side-yard half court might offer better equipment access than a rear-yard full court surrounded by landscaping and fencing.
Grading, Subbase, and Drainage Design
Proper drainage prevents uneven surfaces and premature cracking. Typical outdoor basketball courts need about 1% slope (roughly 1/8” per foot) to shed water without noticeably affecting play.
- Building the subbase involves:
- Strip topsoil and remove debris
- Compact native soil thoroughly
- Add 4-6” of compacted crushed stone (more in poor soils)
- Test compaction with a plate compactor
Common drainage solutions include perimeter swales, French drains along the low side, and redirecting downspouts away from the court. In freeze-thaw regions, robust subbase thickness and drainage are critical to minimize heaving and ensure the court doesn’t develop cracks during cold winters.
Building the Hard Court Base (Asphalt or Concrete)
This section covers constructing the structural slab that supports your basketball surface. Before any digging, call 811 to mark all underground utilities. Professional installation is strongly recommended for both base types due to the precision and equipment required.
Concrete Basketball Court Slab
Typical residential basketball slabs are 4-5” thick using 3,000-4,000 psi concrete mixes. For multi-purpose courts that also serve as parking areas, increase thickness accordingly.
Reinforcement options include welded wire mesh or rebar grid. Plan saw-cut control joints to avoid interfering with the free-throw line and three-point arc markings. Finishing requires screeds and power trowels to achieve a smooth, level surface with a light broom finish for grip, avoiding overly slick surfaces under acrylic coatings.
Allow 28 days of curing before installing acrylic sport coatings. Monitor the weather during curing and avoid trapping moisture. Professional concrete crews are essential for full-size or half-court slabs due to the precision involved.
Asphalt Basketball Court Base
Asphalt bases typically require 2-3” of properly laid asphalt over a well-compacted crushed stone subbase. Machine paving with professional equipment ensures consistent thickness and compaction.
Asphalt generally needs 2-4 weeks of curing in warm weather before acrylic application, shorter than concrete but still requiring patience. The surface must be properly cured and free of oils before coating. Keep asphalt edges clean and supported to prevent crumbling at out-of-bounds lines.
A diy backyard basketball court approach works for some projects, but professional paving crews deliver significantly better results for asphalt work.
Acrylic sport surfacing transforms a plain asphalt or concrete pad into a true home court with controlled traction, custom colors, and predictable ball response. This section covers both standard acrylic and cushioned builds, both installed over hard bases only, not synthetic products.
Surface Preparation and Acrylic Coating System
- Proper surface prep is essential for long-term performance:
- Clean thoroughly and remove laitance or asphalt sheen
- Patch all cracks and grind high spots
- Confirm no standing water remains after a hose test
A typical outdoor acrylic system includes acrylic resurfacer coats to fill minor texture, followed by 2-3 acrylic color coats. Apply coatings only when temperatures are above 50°F and rising, with no rain forecast during curing.
Choose non-slip textures appropriate for basketball, more textured than tennis surfaces but not overly aggressive. High-quality, UV-stable products resist fading and chalking in extreme weather conditions.
Optional Cushioned Acrylic Basketball Courts
Cushioned acrylic systems feature multiple rubberized layers installed on the base, then sealed under acrylic color coats. Benefits include reduced impact on knees and ankles and more comfortable play for daily users.
Cushion builds add cost and extend installation time, but represent a smart investment for high-use courts. These systems should always be installed by experienced contractors because thickness and uniformity dramatically affect playability. Cushioned surfaces offer a premium feel similar to professional level performance facilities.
Hoops, Lines, Lighting, and Court Accessories
Quality goals, accurate line markings, and proper lighting transform a basic pad into a safe, enjoyable court for outdoor basketball. These additional features make the difference between a functional surface and a true playing area.
Installing Basketball Goals (Hoop Systems)
- In-ground basketball goal systems set in concrete footings provide the stability needed for competitive play. Installation requires:
- Drilling a 36-48” deep hole
- Placing the anchor system
- Pouring high-strength concrete
- Allowing cure time before mounting the pole and backboard
Regulation rim height is 10 feet, with typical backboards measuring 72” x 42” for regulation play. Adjustable-height systems (7.5’ to 10’) work well for families with younger children. Backboards should overhang the court approximately 4 feet from the baseline.
Padding for poles and lower backboard edges improves player safety, especially for courts used by younger athletes.
Court Line Markings and Layout Details
Outdoor courts typically follow high school or NBA-style markings. Select your rule set before painting, as three-point arc distances differ:
| Level | 3-Point Distance | Center Circle Radius |
| NBA | 23’ 9” | 6 feet |
| NCAA College | 20’ 9” | 4 feet |
| High School | 19’ 9” | 4 feet |
The free throw line is always 15 feet from the front of the backboard. Use durable, UV-resistant line paint compatible with acrylic surfaces. Double-check all measurements using a tape measure before painting; even small errors become obvious during gameplay.
Some owners add markings for a pickleball court or 3×3 basketball, but keep basketball lines visually dominant for clarity on multi-purpose courts.
LED lighting on 15-20’ poles enables night games and extends usability. Goal-mounted lights work for smaller courts. Direct light onto the court with cut-off fixtures to avoid spill into neighbors’ windows.
Perimeter fencing (8-12’ chain-link or netting) along baselines keeps balls on-site. Fencing is an attractive feature that also protects landscaping and windows.
- Simple amenities improve usability:
- Benches or spectator seating
- Water access nearby
- Storage boxes for balls
- Landscaping that frames the court without dropping debris
Cost, Timeline, and Long-Term Maintenance
Understanding realistic budgets and schedules helps set proper expectations for your court project. The outdoor basketball court depends on numerous variables, including size, site conditions, and surface type selection.
Budget Ranges and Cost Drivers
- Professional installation costs for acrylic-coated outdoor courts vary widely depending on size and specifications. Major cost drivers include:
- Excavation complexity and grading requirements
- Stone subbase depth
- Asphalt vs concrete choice
- Cushioned vs standard acrylic system
- Fencing length, height, and material availability
- Lighting quality and pole count
- Local labor rates
Difficult access (narrow gates, steep grades, no truck access) requires smaller equipment and more materials, significantly increasing overall cost. Request itemized quotes, separating base construction, acrylic surfacing, equipment, and extras to potentially phase the project. Include a 10-15% contingency for unforeseen site preparation issues.
Construction Timeline and Weather Considerations
- A typical sequence spans:
- 1-3 weeks for planning and permits
- Several days for excavation and base work
- 1-2 days for asphalt or concrete placement
- 2-4 weeks for curing (longer for concrete)
- Several days for acrylic surfacing and striping
Total calendar time often spans 3-8 weeks. Outdoor work is weather-dependent; heavy rain, extreme heat, or cold snaps delay base work and coating applications. Schedule major work during historically drier seasons and plan acrylic surfacing for sustained mild conditions.
Routine Maintenance and Resurfacing Intervals
- Regular upkeep maximizes the court’s lifespan:
- Sweep or blow leaves and debris weekly
- Remove standing water promptly
- Trim nearby trees to limit organic buildup
- Conduct annual inspections for cracks, fading lines, or worn color
Acrylic-coated courts typically need full resurfacing every 5-8 years, depending on climate and use intensity. Hard courts can be renewed multiple times over a 20+ year life through patching and resurfacing rather than complete reconstruction, a key advantage over systems requiring minimal maintenance claims that don’t hold up.
Avoid harsh chemicals, metal shovels, or aggressive pressure washing. For routine cleaning in snowy climates, use plastic shovels to protect the surface. Low-maintenance practices extend the time between resurfacing cycles.
Final Thoughts
Building an outdoor basketball court requires thoughtful planning, proper site preparation, and the right materials to ensure long-term durability and performance. From selecting the ideal court size and ensuring proper drainage to installing a solid asphalt or concrete base and applying professional acrylic coatings, each step plays a vital role. With the right design and maintenance approach, your court can provide consistent play, safety, and enjoyment for many years.
Working with an experienced outdoor basketball court builder like Talbot Tennis ensures your project is completed with precision and expertise. In addition to basketball courts, we also provide tennis court resurfacing in Mount Pleasant, Hilton Head, and Myrtle Beach, SC, delivering high-quality surfaces that are built to perform and last in a variety of conditions. Contact us today to get started on your custom court project.
Frequently Asked Questions
Can I convert an existing concrete patio or old tennis court into a basketball court?
Many outdoor basketball courts start from existing hard surfaces. Large patios, driveways, or older tennis courts can often be repurposed if structurally sound and well-drained. The process involves crack repair, leveling low spots, installing acrylic sport coatings, and adding regulation lines plus goals. Severe structural issues like deep active cracks or major settlement may require partial base reconstruction. Have a sports court professional evaluate older slabs to determine whether resurfacing or replacement offers better long-term value.
How loud is an outdoor basketball court, and can anything be done to reduce noise?
Hard outdoor courts generate ball impact sounds and player noise, which can affect nearby neighbors. Strategies include positioning courts away from bedroom windows, using perimeter fencing with windscreen fabric, adding dense landscaping, and establishing reasonable play-hour guidelines. Cushioned acrylic systems slightly soften footfall noise compared to bare concrete, though ball bounce sounds remain. Discuss the project with adjacent neighbors early to maintain good relationships.
Can I use my outdoor basketball court for other sports like pickleball or volleyball?
Acrylic-coated outdoor courts work well as multi-sport surfaces for basketball, pickleball, small-sided tennis, and futsal. Add extra line sets in contrasting colors and use removable nets or portable posts for quick transitions. However, too many colored lines can confuse players, so prioritize one or two main indoor court styles when designing. Plan additional space and anchors if volleyball or net sports will be regular activities.